
Is your Zoysia lawn looking tired and unhealthy? You might be dealing with thatch buildup—a layer of dead grass and roots that chokes your lawn’s growth.
But here’s the catch: dethatching your Zoysia grass can be tricky. If you’re not careful, you could end up damaging the very lawn you want to improve. Don’t worry—this guide will show you exactly how to dethatch your Zoysia lawn safely and effectively.
By the time you finish reading, you’ll have the confidence to bring new life to your lawn without any risk. Ready to get started? Let’s dive in!

Credit: ngturf.com
Signs Of Thatch In Zoysia Lawns
Thatch is a layer of dead grass and roots that builds up on Zoysia lawns. It can harm your grass if it gets too thick. Knowing the signs of thatch helps you take care of your lawn early. Watch for changes in your grass and soil to catch thatch problems fast.
What Thatch Looks Like
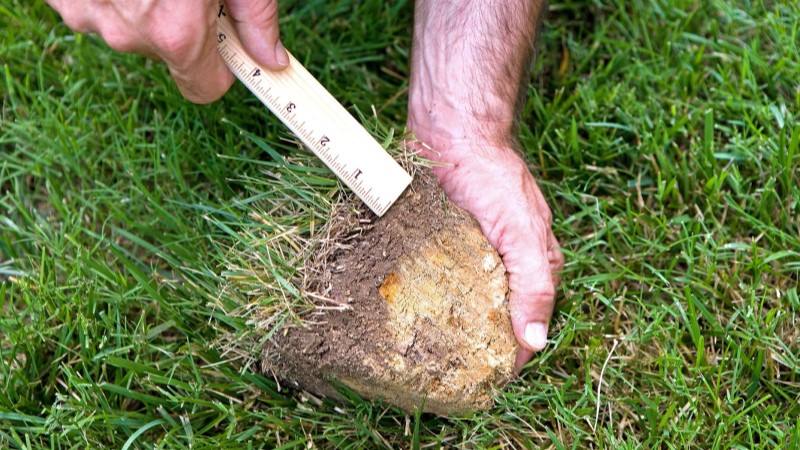
Thatch looks like a spongy, brown layer under the grass. It feels soft and springy when you press on it. The layer sits between the green grass blades and the soil. You might see dead grass stems and roots in the thatch. A healthy lawn has little to no thatch. If the layer is over half an inch thick, it needs removal.
Effects On Lawn Health
Thatch blocks water and nutrients from reaching the soil. This stops roots from growing deep and strong. Your lawn may look dry or yellow even with enough water. Thatch also traps heat, stressing the grass in hot weather. It can hide pests and diseases too. Removing thatch helps your Zoysia lawn stay green and healthy.
Tools Needed For Dethatching
Dethatching a Zoysia lawn helps keep it healthy and green. You need the right tools to do this job without harming the grass. Choosing the proper tools makes dethatching easier and safer for your lawn.
There are two main types of tools: manual and power dethatchers. Each has its uses based on lawn size and thatch thickness. Understanding these tools helps you pick the best option for your lawn care.
Manual Rakes
Manual rakes are simple and affordable. They have sharp blades to pull up dead grass and debris. These rakes work well on small lawns or light thatch layers. You control the pressure, so it is gentle on your Zoysia grass.
They need more effort but reduce risk of damage. Perfect for spot dethatching or delicate areas.
Power Dethatchers
Power dethatchers have rotating blades or tines. They remove thick thatch quickly and cover large areas fast. These machines are best for big lawns or heavy thatch build-up.
Use power dethatchers carefully to avoid cutting the grass roots. Adjust the depth setting to protect your lawn.
When To Use Each Tool
Use manual rakes for small lawns and light thatch. They allow careful dethatching without stress on grass.
Choose power dethatchers for bigger lawns or thick thatch layers. They save time and effort but need careful handling.
Assess your lawn size and thatch amount before picking a tool. This helps protect your Zoysia lawn during dethatching.
Best Time To Dethatch Zoysia
Dethatching a Zoysia lawn helps keep it healthy and green. Choosing the best time is very important. Doing it at the wrong time can harm your grass. The right timing helps your lawn recover quickly. Learn when to dethatch for the best results.
Seasonal Considerations
Spring and early summer are the best seasons to dethatch Zoysia grass. The soil is warm, which helps the grass heal faster. Avoid dethatching in fall or winter. The grass grows slowly then. Dethatching in cold months may stress the lawn. Warm weather helps new grass grow after dethatching. Keep the weather dry for a few days before dethatching.
Optimal Lawn Growth Stage
Dethatch during the active growth stage of your Zoysia lawn. This stage is when the grass grows quickly. Usually, this is late spring to early summer. The grass can repair damage fast at this time. Avoid dethatching when the grass is dormant or slow-growing. Healthy, green grass shows it is ready. Check if the grass blades are long and strong. This means your lawn can handle dethatching safely.
Step-by-step Dethatching Process
Dethatching a Zoysia lawn keeps it healthy and green. Thatch is a layer of dead grass and roots. Too much thatch stops water and nutrients from reaching roots. Removing it helps your lawn breathe and grow better. Follow these steps to dethatch without hurting your Zoysia grass.
Preparing The Lawn
Start by mowing your lawn short. Set your mower blade low but not too close. Rake the lawn to remove loose debris and leaves. Water the lawn lightly a day before dethatching. Moist soil makes dethatching easier and less stressful. Avoid soggy ground to prevent soil damage.
Dethatching Techniques
Use a dethatching rake or a power dethatcher. For small lawns, a hand rake works well. Pull the rake gently across the grass in one direction. For larger lawns, use a dethatching machine slowly. Make two passes at right angles to each other. Remove the loosened thatch with a rake or blower. Avoid deep raking to protect grass roots.
Post-dethatching Care
Rake up all the removed thatch from the lawn. Water the lawn deeply after dethatching. Apply a light layer of fertilizer to help recovery. Avoid heavy foot traffic for a few days. Mow the lawn only when grass grows back. Regular watering helps the lawn heal faster.
Avoiding Damage During Dethatching
Dethatching a Zoysia lawn helps keep it healthy and green. It removes the layer of dead grass and roots. This allows water, air, and nutrients to reach the soil better. But dethatching can also harm the grass if done wrongly. Avoiding damage is key to a strong lawn after dethatching.
Using the right tools and methods protects the grass and soil. Paying attention to sensitive areas and knowing when to stop prevents stress on the lawn. Watch the grass closely during and after dethatching to catch any signs of damage early.
Adjusting Equipment Settings
Set dethatching tools to the correct depth. Too deep cuts can hurt the grass roots. Use lighter settings on machines to avoid tearing the grass. Test on a small patch before working on the whole lawn. Keep blades sharp to make clean cuts, reducing stress on the grass.
Handling Sensitive Areas
Avoid dethatching near newly planted grass or bare spots. Use gentler methods like hand raking in delicate zones. These areas need extra care to prevent damage. Work slowly and carefully around trees and garden beds. Protect these spots to keep the lawn uniform and healthy.
Signs Of Over-dethatching
Yellowing grass or bare patches show too much dethatching. The lawn may look thin and weak after the process. Brown or dry spots can mean roots are damaged. Stop dethatching if you see these signs. Give the lawn time to recover before more work.
Credit: atlasturf.com.au
Aftercare To Promote Recovery
After dethatching a Zoysia lawn, proper care helps it heal fast. The grass needs time and support to grow thick and green again. Follow these simple steps to protect your lawn and boost its recovery.
Watering Tips
Water the lawn deeply but less often. This encourages strong root growth. Early morning watering reduces water loss from evaporation. Avoid overwatering as it can cause root rot. Keep soil moist but not soggy for best results.
Fertilizing Schedule
Apply fertilizer about two weeks after dethatching. Use a balanced, slow-release fertilizer to feed the grass gently. Avoid high nitrogen fertilizers right after dethatching. Fertilize again in six to eight weeks to support steady growth.
Managing Lawn Traffic
Limit foot traffic on the lawn for at least three weeks. Walking on it can damage new growth and slow recovery. Use temporary paths or stepping stones if needed. Give the grass time to strengthen before heavy use.
Preventing Future Thatch Build-up
Preventing future thatch build-up in your Zoysia lawn keeps it healthy and green. Thatch is a layer of dead grass and roots that block water and nutrients. Stopping it from growing too thick helps your lawn breathe and grow well. Simple care steps make a big difference over time.
Regular Lawn Maintenance
Keep your lawn clean by removing leaves and debris often. Rake lightly to stop dead grass from piling up. Water your lawn deeply but less often to encourage strong roots. Fertilize with balanced nutrients to support healthy growth. These steps reduce dead material and slow thatch build-up.
Proper Mowing Practices
Cut your Zoysia grass to the right height, about 1 to 2 inches. Avoid cutting too short because it stresses the grass. Use a sharp mower blade for clean cuts. Mow frequently to avoid cutting too much at once. Proper mowing keeps grass strong and prevents thick thatch layers.
Soil Aeration Benefits
Aerate your lawn yearly to improve air, water, and nutrient flow. It breaks compacted soil and helps roots grow deeper. Aeration also speeds up thatch breakdown by soil microbes. Use a core aerator for best results. Healthy soil means less thatch and a more vibrant lawn.

Credit: www.youtube.com
Frequently Asked Questions
What Is Dethatching And Why Is It Important For Zoysia Lawns?
Dethatching removes the layer of dead grass and debris on your lawn’s surface. It helps improve air, water, and nutrient flow. This process keeps Zoysia grass healthy and prevents disease or pest problems.
When Is The Best Time To Dethatch A Zoysia Lawn?
The best time to dethatch Zoysia grass is during its active growing season. Late spring to early summer is ideal. This timing allows the lawn to recover quickly and maintain its lush, green appearance.
How Can I Dethatch Without Damaging Zoysia Grass?
Use a dethatching rake or machine with shallow blades. Avoid aggressive dethatching that can harm roots. Water the lawn lightly before and after to reduce stress and promote healing.
How Often Should I Dethatch My Zoysia Lawn?
Dethatch your Zoysia lawn every 1 to 3 years, depending on thatch buildup. Inspect the lawn regularly to decide. Over-dethatching can weaken the grass, so avoid doing it too often.
Conclusion
Dethatching your Zoysia lawn helps it grow strong and healthy. Use gentle tools and work carefully to avoid damage. Remove only the thatch layer, not the grass roots. Water your lawn well after dethatching for quick recovery. Regular care keeps your lawn green and thick.
A little effort now saves big problems later. Enjoy a lush, beautiful lawn all season long.